The simple and most common way of sending HTML data to a back-end server is using an anchor link
<a href="./echo.rexx">echo</a>
This invokes the back-end program and displays the output. You have no control over the headers or what data is sent.
You can do more sophisticated stuff using the JavaScript fetch function, for example
- specify different headers
- change the data sent to the server, for example specify which data you want sent to the server, perhaps only send changed values rather than all input values
- send the data to a different URL.
A quick aside on reading the JavaScript documentation and use of the arrow function
A lot of the documentation on JavaScript uses the arrow function, which can be useful, but I find distracting.
You can use a function such as mysubmit which takes an event:
function mysubmit(event)
{
console.log(event);
}
document.forms["target"].addEventListener('submit', mysubmit )
When the submit event occurs, “mysubmit” is invoked, and passed the event;
This can also be written, using inline functions as
document.forms["target"].addEventListener('submit', mysubmit(event) => { console.log(event;...} )
or
document.forms["target"].addEventListener('submit', (event) => { console.log(event;...} )
I have also seen it written as
function mysubmit(zevent)
{
console.log(zevent)
}
document.forms["target"].addEventListener('submit', (event) => mysubmit(event) )
At first glance this looks it could be simplified. However this is useful if you wanted to pass additional parameters to the function.
function mysubmit(zevent,a)
{
// a will have the value abc
console.log(zevent)
}
document.forms["target"].addEventListener('submit', (event) => mysubmit(event,'abc') )
I find the first example, document.forms[“target”].addEventListener(‘submit’, mysubmit ) easier to follow; and easier to write as you have to worry about matching the ending “})”s.
Using fetch
I used an HTML page with a form, so I could process the data. The fetch function sends the data to the specified URL, and waits for the response. You can specified headers and body and you get back a response object.
Setup
You need to associate a function with the “submit” of the form
document.forms["target"].addEventListener('submit', mysubmit )
where mysubmit is the name of a callback function, for example
function submit(event)
{
event.preventDefault();
displayChanged(event)
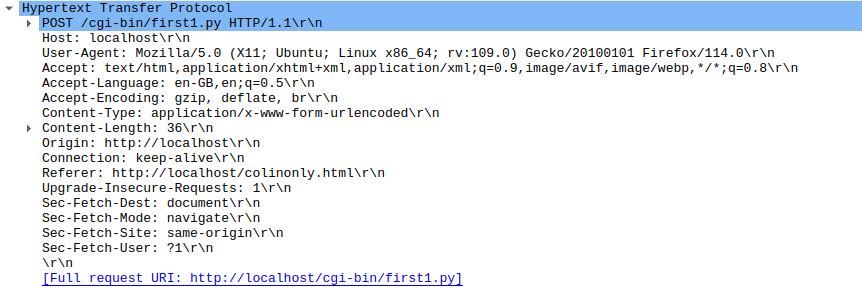
fetch("./echo.rexx", {
method: 'POST',
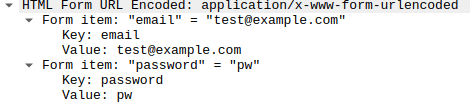
body: new URLSearchParams(new FormData(event.target)) // event.target is the form
})
.then( check )
.then( zesult )
.catch(mycatch )
}
Where
- function submit(event) { defines the function, the parameter variable is called event.
- event.preventDefault(); disables normal behaviour and lets me manage it.
- displayChanged(event) my processing of the data before sending the data, see below.
- fetch(“./echo.rexx”, { This sends the request to the backed “./echo.rexx”.
- method: ‘POST’,
- body: new URLSearchParams(new FormData(event.target)) Fetch has two parameters, the URL and a set of options, such as body, a set of headers{} etc. In this instance the second parameter is {method:”POST”, body: …. }.
- }) // end of fetch
- .then(check) this waits until the fetch finishes, see below
- .then(zesult( ) see below
- .catch( mycatch ) any exception
- } // end of function
The .then processing is about using promises. Basically the .then has a wait for the response and return something to the next .then statement.
Check
This waits for the completion of the request.
function check(response)
{
  if (!response.ok) {
       throw new Error(`HTTP error! Status: ${response.status}`);
  }
  return response.text()
 }
- It checks the “ok” flag in the data, if it is not OK, then throw an exception. The variable response.status has an error message.
- Extract the body of the response and pass it on.
zesult
This waits for the completion of the previous “return response.text()”
function zesult(text)
{
//console.log(text );
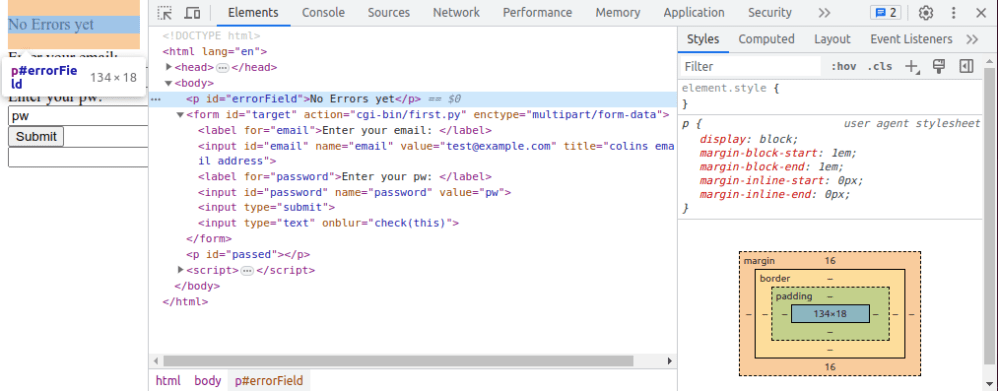
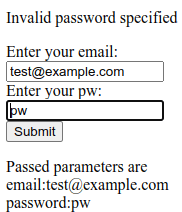
let e = document.getElementById("errorField");
e.innerHTML = text;
return (text)
}
and replaces the value of the piece of HTML with id=”errorfield”. For example
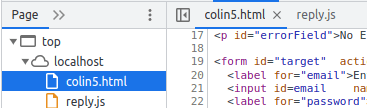
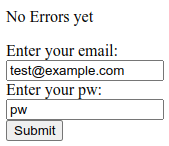
<p id="errorField" style="color:red ">No Errors yet</p>
I do not know why two “.then”s are needed. It looks like it started another asynchronous process to extract the body from the response. In “check” if you display “response” it gives you some data. If you display “response.body” is gives a in-flight promise.
If you are tracing this, and you do not get into your code, check you have specified event.preventDefault(); before you do the fetch.
Looking at what data is being sent
Formdata allows you to work with the keyword=value data as generated by a form. You cannot get the data for other HTML elements outside of a form.
In my submit function I have displayChanged(event)
function displayChanged(event)
{
// display the parameters
...
// Display what has changed
...
}
Display the parameters
function displayChanged(event)
{
  // display all the data
  // extract into an iterable object
 let f = new FormData(event.target)  ;
 let data = ""
 for ([key, value] of f) {
    data += ", " + key + ":" + value
 }
 console.log(data)
...
}
For the data in my form, this displayed
,i1:initial value, text1:test@example.com, email:test@example.com, password:pw18,password25:pw25
where the bold names are the input field names.
Display what has changed
There is no direct way of processing just the changed variables, but you can fake it.
I had an input fields defined with an onchange call back.
<input id="password" name="password" value="pw18" onchange="change(this)" >
<script>
function change(o){
  if  (o!= undefined)
     o.setAttribute("changed","yes");
}
</script>
If the field is changed, then the onchange -> change function is called. This sets an attribute “changed” to “yes”.
In the submit processing there
function displayChanged(event)
{
...
  // display what has changed
  let er = event.target;
  Array.from(er).forEach((r)  =>
  {
    let id = r.getAttribute("id")
    let ch = r.getAttribute("changed")
    console.log( "id " + id + " changed " + ch )
  })
...
}
When I changed the two password fields, the console log had
id text1 changed null
id email1 changed null
id password21 changed yes
id password2 changed yes
Changing the parameters passed to the server.
You pass the parameters to the server using
fetch("./echo.rexx", {
    method: 'POST',
    body: new URLSearchParams(new FormData(event.target))
You can create a new instance of FromData, add keyword/value parameters to it, and pass it through to the back-end.
Above I explained how you can identify the “changed” data. You could take these elements and add to a new FormData, and pass those through to the server.