Yes, I know you do not logon to ISPF, but the title is shorter than how do I logon to TSO, and start ISPF so my data sets are allocated as I want them. I wrote this blog post because I was trying to use ISMF and save information into ISPF tables, but I could not use the information in the tables because my table data set was not in the ISPTLIB concatenation.
When I used TSO ISRDDN to display the data sets allocated to my TSO session I had
Enter LOGON parameters below: RACF LOGON parameters: Userid ===> COLIN Password ===> Procedure ===> ISPFPROC Group Ident ===> Acct Nmbr ===> ACCT# Size ===> 2096128 Perform ===> Command ===> ex 'colin.zlogon.clist'
You can influence what happens by specifying a different Procedure, or specifying a command in Command.
The PROCEDURE ===> ISPFPROC is JCL to start a TSO address space and allocate system wide datasets.
Once ISPF has started, you can issue the command TSO ISRDDN to display all of the datasets allocated to TSO. The ISRDDN command member ISPFPROC will find and show you which of the allocated data sets contain the member. it gave me
                           Current Data Set Allocation         Member was found
 Command ===>                                                  Scroll ===> PAGE

   Message             Act DDname   Data Set Name   Actions: B E V M F C I Q
  Member: ISPFPROC    >_   SYSPROC  ADCD.Z31B.PROCLIB
You can enter the B command in the >_ field to browse the member directly
Aside:
The Actions: B E V M F C I Q are commands for
B Browse the first sixteen data sets or a single data set.
E Edit the first sixteen data sets or a single data set.
V View the first sixteen data sets or a single data set.
M Show an enhanced member list for the first sixteen data sets or a single data set.
creates the environment PATH=/bin/:/usr/lpp/zosmf/bin
Allocates lots of data sets, for example SYSPROC has USER…..CLIST depending on the value of the global symbol &SYSVER (Z31B at the moment). If I IPL a different level of z/OS it may have a different level, such as Z24C
Allocates fixed name data sets such as ISP.SISPCLIB
Allocates lots of ISPF tables for input
Allocates an SDSF menu data set
Allocates a table ISPTABL for ISPF
But does not allocate an ISPTABL for my personal tables.
Which says invoke TSO (IKJEFT01) and execute the %ISPFCL Clist (or REXX).
Use PF3 to return from ISRDDN.
Where is ISPFCL?
The above JCL uses CLIST/REXX ISPFCL as a profile to do additional processing, such as allocating additional data sets.
You could allocate datasets in the ISPF JCL instead of through the CLIST – but the CLIST allows conditional processing, such as if the ISPFPROF data set does not exist, then allocate it.
You can use TSO ISRDDN again and specify member ISPFCL . The member was found, in four places (see the Member: below)
                           Current Data Set Allocations           Row 98 of 118
 Command ===>  _____________________                            Scroll ===> PAGE

   Message             Act DDname   Data Set Name   Actions: B E V M F C I Q
  Member: ISPFCL      >_   SYSPROC  USER.Z31B.CLIST
                      >_            FEU.Z31B.CLIST
  Member: ISPFCL      >_            ADCD.Z31B.CLIST
                      >_            ISP.SISPCLIB
  Member: ISPFCL      >_            USER.Z31B.PROCLIB
                      >_            FEU.Z31B.PROCLIB
  Member: ISPFPROC    >_            ADCD.Z31B.PROCLIB
                      >_            ISM403.SFMNEXEC
                      >_            AUT430.SINGREXX
                      >_   SYSUADS  SYS1.UADS
                      >_   SYSUDUMP ---------- JES2 Subsystem file -------------
The member is found in 4 places. You can browse a member by entering B in the >_
SET &DSNAME = &STR(&SYSUID..&SYSNAME..ISPF.ISPPROF) ALLOC DA('&DSNAME') SHR FILE(ISPPROF) ALLOC DA('&DSNAME') SHR FILE(ISPTABL) IF &LASTCC ¬= 0 THEN DO /* Allocate the ISPF Prof dataset */ ... END
The FREE FILE(ISPPROF ISPTABL) says drop (ignore) the existing definitions for ISPPROF and ISPTABL. The CLIST will reallocate them.
The ALLOC DA(‘&DSNAME’) SHR FILE(ISPTABL) allocates my dataset to the ISPTABL ddname.
The problem is that you cannot easily concatenate my data sets to the ISPTLIB concatenation. You can use the TSO ALLOCate command to allocate a list of data sets to a DDNAME, but not just to add one data set to an existing allocated DDNAME. See Adding a data set to an existing DDNAME in TSO.
Starting ISPF
When you logon to the TSO Logon panel it has
Command ===> ex 'colin.zlogon.clist'
The command (if specified) will be processed after any command found in the PARM field of the EXEC JCL statement in your logon procedure.
You can specify ISPF, a clist, or other command. If you want to invoke ISPF from your clist you will need to invoke the ISPF command for example
/* Rexx */
  trace r
  say "in colin.zlogon.clist"
  address TSO

  "alloc fi(ISPTLIB) DA('COLIN.S0W1.ISPF.ISPPROF') SHR "
  zl =userid.SDSF.isftabl  /* so we get colin.zlogon.clist */
  if SYSDSN(zl) = OK then
  do
   "alloc fi(isftabl) da('"zl"') shr reus"
  end
  req = "ALLOC FI(tmp) DA('COLIN.S0W1.ISPF.ISPPROF') SHR "
  if bpxwdyn(req )  =0 then
         call bpxwdyn "concat ddlist(ISPTLIB,tmp) "
  "ispf"
With this, ISPF starts with my data sets allocated as I want them!
I wanted to add a data set to the already allocated ISPTLIB concatenation. You can use the TSO ALLOCate command to allocate a list of data sets, but not to add a data set to an existing definition.
Lionel B. Dyck pointed me to the TSO function bpxwdyn.
When I logon to TSO I invoke a userid.ZLOGON.REXX data set
The bpxwdyn(req ) allocates the dataset to the DDNAME TMP.
The call bpxwdyn “concat ddlist(ISPTLIB,tmp) copies the data set(s) in the tmp DDNAME to the end of the ISPTLIB DDNAME
ispf starts ISPF.
The TSO ISRDDN command gave me
                          Current Data Set Allocations           Row 68 of 122
Command ===>                                                  Scroll ===> CSR

 Volume   Disposition Act DDname   Data Set Name   Actions: B E V M F C I Q
 B3RES1   SHR,KEEP   >    ISPTLIB  ISP.SISPTENU
...
 A4USR1   SHR,KEEP   >             COLIN.S0W1.ISPF.ISPPROF
Easy once you know how.
On the CBTAPE are KONCAT and CONCAT which do a similar function.
The Java Health centre has an agent running in the JVM of interest, and there is Eclipse plug-in to display the data.
A Java server such as Liberty ( as used in z/OSMF, z/OSMF and MQWEB) can provide information on how the server is running. I was running MQWEB with Openj9, Java 21 (Semeru).
You need to configure the Liberty server and have something to process the data such as Health Center running on Eclipse.
You can display information in graphical time line format, such as
CPU used, system and application as used by the JVM
Which classes are being used
The environment – such as the parameters used to start the JVM
Garbage collection activity
I/O – number of files open, and open activity
Method profiling
Threads in use.
Configure the Eclipse
I installed Health Center from the Market place.
How to collect the data
You can configure the JVM in different modes:
headless – data is collected and written to the local file system
collect from the start – and view in Eclipse, this means you get all of the Java class loading activity
start collecting only after Eclipse has started, and connected to the JVM. I use this method. I start my server, and run a workload to “warm up the JVM” then use Eclipse to show the activity due to my testing.
Note the jmx=on and the port number. You need this for the Eclipse configuration. The level=off means do not start collecting data until the Health centre agent connects.
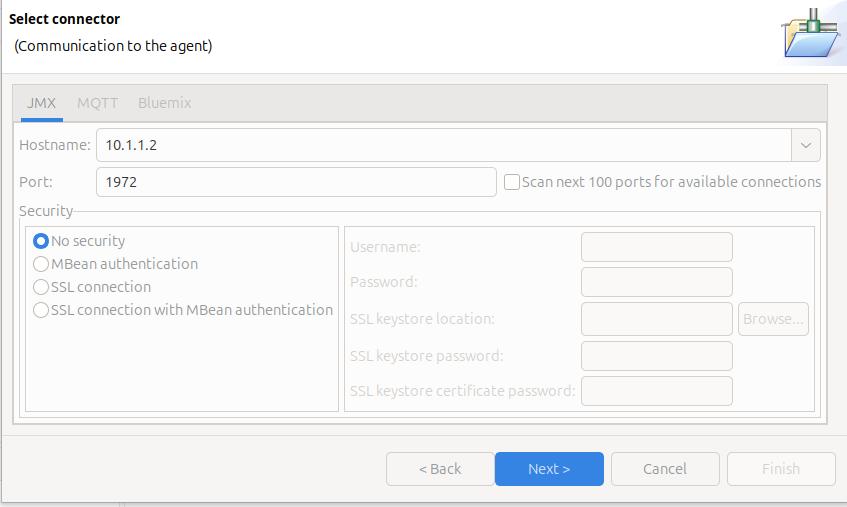
In Eclipse
File -> New Connection… -> Enable an application for monitoring -> Next.
On the Select connector panel I used
Once it worked, I enabled security.
Click Next
The Health Centre then starts searching at the specified port. I disable the Scan next 100 ports… When it manages to connect to the port, click Finish.
It takes a few seconds to start the data collection, and start downloading the data.
Let the JVM warm up
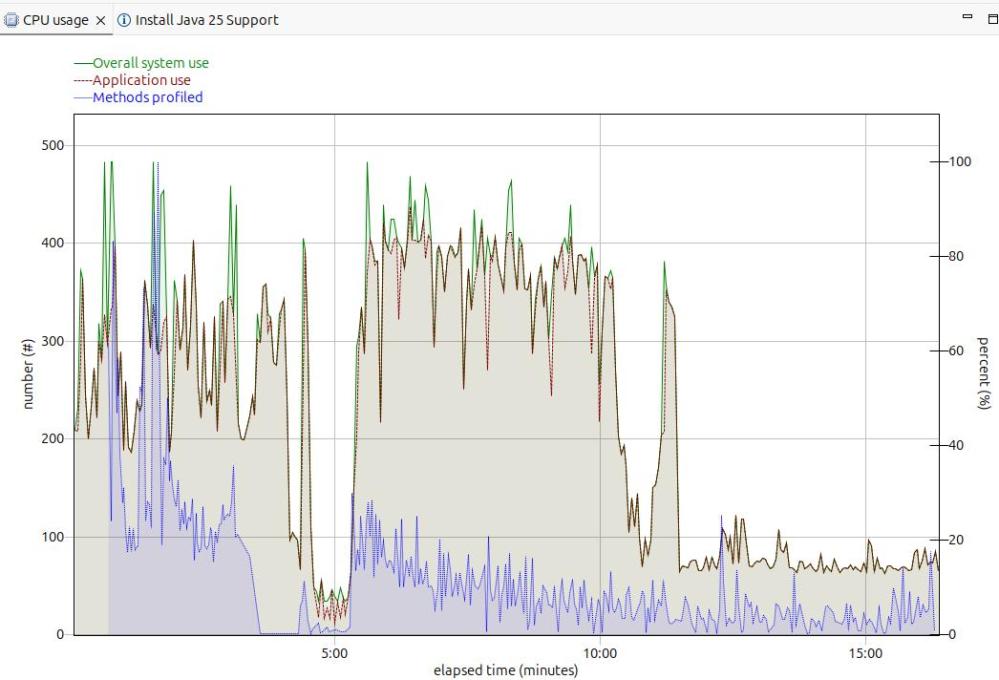
The image below shows the CPU usage from the start of the server.
For the first 5 minutes, this is the JVM starting up with no workload. Afterwards the CPU used drops to a low value.
After 5 minutes, I started my workload. For the first 12 or so minutes the CPU is high, but after about 13 minutes it levels out. If you want to do any measurements of cost per transaction you should take them from this period. During the “warm up” period, the JVM is optimising the code etc.
The green line shows the system CPU usage. The red line (and grey area) shows the Application usage. We can see most of the CPU used is application usage.
The number of methods profiled is the JVM optimising the code. It takes the “hottest” classes and does those first… until all (most) of the classes are optimised.
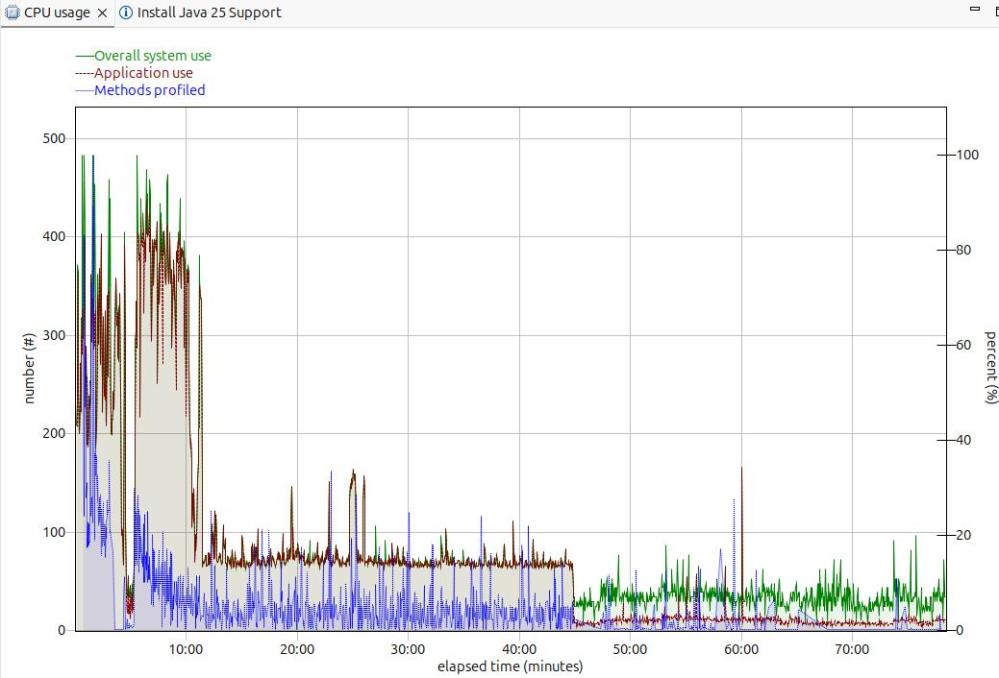
Long term monitoring.
f
From this diagram you can see the JVM startup, the initial part of my test where the JVM was warming up, the remainder of the test, and the JVM overhead after the test.
You need to take all of these into consideration when running performance tests.
Running performance tests
I set up my Work Load Manager configuration to record the number of MQ transactions, and had a report class for the MQWEB server. From this I can calculate the cost per transaction.
[06:51:52] com.ibm.diagnostics.healthcenter.Agent FINE: System receiver, version 1.0
[06:51:52] com.ibm.diagnostics.healthcenter.Agent FINE: /usr/lpp/java/J21.0_64//lib/libhcapiplugin.so, version 1.0
[06:51:52] com.ibm.diagnostics.healthcenter.java FINE: Health Center Agent 4.0.7
06:51:53com.ibm.java.diagnostics.healthcenter.agent.mbean.HCLaunchMBean <init>
INFO: Agent version "3.0.21.202109031203"
06:51:56 com.ibm.java.diagnostics.healthcenter.agent.mbean.HCLaunchMBean startAgent
INFO: Health Center agent running in off mode.
06:51:56 com.ibm.java.diagnostics.healthcenter.agent.mbean.HCLaunchMBean startAgent
INFO: Health Center agent started on port 1972.
I’m running my little zD&T z/OS system on my laptop. I am the only person on this system, so I have to do every thing myself.
I started my MQ system last week, and now it is complaining that it cannot allocate archive logs. From my experience with MQ, I know this is serious. I know I have lots of space on my disks, so why can’t MQ use it. I’ll go through the diagnostic path I took, which shows the SMS commands I used, and give the solution.
The blog post One minute SMS covers many of the concepts (and commands used).
The error messages
CSQJ072E %CSQ9 ARCHIVE LOG DATA SET 'CSQARC2.CSQ9.B0000002' HAS BEEN ALLOCATED TO NON-TAPE DEVICE AND CATALOGUED, OVERRIDING CATALOG PARAMETER
IGD17272I VOLUME SELECTION HAS FAILED FOR INSUFFICIENT SPACE FOR DATA SET CSQARC2.CSQ9.A0000002 JOBNAME (CSQ9MSTR) STEPNAME (CSQ9MSTR) PROGNAME (CSQYASCP)
REQUESTED SPACE QUANTITY = 120960 KB
STORCLAS (SCMQS) MGMTCLAS (        ) DATACLAS (        )
STORGRPS (SGMQS SGBASE SGEXTEAV  )
IKJ56893I DATA SET CSQARC2.CSQ9.A0000002 NOT ALLOCATED+
IGD17273I ALLOCATION HAS FAILED FOR ALL VOLUMES SELECTED FOR DATA SET
CSQARC2.CSQ9.A0000002
IGD17277I THERE ARE (247) CANDIDATE VOLUMES OF WHICH (7) ARE ENABLED OR
QUIESCED
IGD17290I THERE WERE 3 CANDIDATE STORAGE GROUPS OF WHICH THE FIRST 3 814
WERE ELIGIBLE FOR VOLUME SELECTION.
THE CANDIDATE STORAGE GROUPS WERE:SGMQS SGBASE SGEXTEAV
IGD17279I 240 VOLUMES WERE REJECTED BECAUSE THEY WERE NOT ONLINE
IGD17279I 240 VOLUMES WERE REJECTED BECAUSE THE UCB WAS NOT AVAILABLE
IGD17279I 7 VOLUMES WERE REJECTED BECAUSE THEY DID NOT HAVE SUFFICIENT
SPACE (041A041D)
Why is it using the storage class SCMQS?
From the ISMF panels,
option 7 Automatic Class Selection
option 5 Display – Display ACS Object Information
Gives a panel
   Panel  Utilities  Help
 ──────────────────────────────────────────────────────────────────────────────
                               ACS OBJECT DISPLAY
 Command ===>

 CDS Name  : ACTIVE

 ACS Rtn   Source Data Set ACS      Member    Last Trans  Last Date  Last Time
 Type      Routine Translated from  Name      Userid      Translated Translated
 --------  -----------------------  --------  ----------  ---------- ----------
 DATACLAS  SYS1.S0W1.DFSMS.CNTL     DATACLAS  IBMUSER     2019/12/17  15:21
 MGMTCLAS  -----------------------  --------  --------    ----------  -----
 STORCLAS  SYS1.S0W1.DFSMS.CNTL     STORCLAS  IBMUSER     2020/12/02  11:23
 STORGRP   SYS1.S0W1.DFSMS.CNTL     STORGRP   IBMUSER     2019/12/17  15:23
So the ACS routine is in SYS1.S0W1.DFSMS.CNTL(STORCLAS)
This file has
PROC STORCLAS
FILTLIST MQS_HLQ          INCLUDE(CSQ*.**,
                                  CSQ.**,
                                  MQS.**,
                                  MQS*.**)
...
SELECT
...
WHEN (&DSN = &MQS_HLQ)
  DO
    SET &STORCLAS = 'SCMQS'
    EXIT CODE(0)
  END
...
END
END
This says for any data set name (&DSN) that match the list (&MQS_HLQ) whic has CSQ* or MQS*, then set the Storage class to ‘SCMQS’
What storage groups are connected with the MQ data set?
Member SYS1.S0W1.DFSMS.CNTL(STORGRP) has
...
WHEN (&STORCLAS= 'SCMQS')
  DO
    SET &STORGRP = 'SGMQS','SGBASE','SGEXTEAV'
    EXIT CODE(0)
  END
...
so these are the storage groups that MQ data sets will use.
What DASD volumes are in the storage group?
D SMS,SG(SGbase)
IGD002I 13:34:38 DISPLAY SMS 699

STORGRP  TYPE    SYSTEM= 1
SGBASE   POOL            +
  SPACE INFORMATION:
  TOTAL SPACE = 29775MB USAGE% = 98 ALERT% = 0
  TRACK-MANAGED SPACE = 29775MB USAGE% = 98 ALERT% = 0
Hows there is 29775 M allocated -and it is 98% full.
D SMS,SG(SGMQS)
IGD002I 13:31:33 DISPLAY SMS 678

STORGRP  TYPE    SYSTEM= 1
SGMQS    POOL            +
  SPACE INFORMATION:
    NOT AVAILABLE TO BE DISPLAYED
***************************** LEGEND *****************************
. THE STORAGE GROUP OR VOLUME IS NOT DEFINED TO THE SYSTEM
+ THE STORAGE GROUP OR VOLUME IS ENABLED
- THE STORAGE GROUP OR VOLUME IS DISABLED
* THE STORAGE GROUP OR VOLUME IS QUIESCED
D THE STORAGE GROUP OR VOLUME IS DISABLED FOR NEW ALLOCATIONS ONLY
Q THE STORAGE GROUP OR VOLUME IS QUIESCED FOR NEW ALLOCATIONS ONLY
> THE VOLSER IN UCB IS DIFFERENT FROM THE VOLSER IN CONFIGURATION
SYSTEM  1 = S0W1
There are no volumes allocated to this storage group.
What volumes are in the storage group?
D SMS,SG(SGBASE),LISTVOL IGD002I 13:39:07 DISPLAY SMS 705
STORGRP TYPE SYSTEM= 1 SGBASE POOL + SPACE INFORMATION: TOTAL SPACE = 29775MB USAGE% = 98 ALERT% = 0 TRACK-MANAGED SPACE = 29775MB USAGE% = 98 ALERT% = 0
How do I see how much space is available in my disks?
ISMF,
option 2 – Volume
option 1 – DASD
This gives a panel
                          VOLUME SELECTION ENTRY PANEL              Page 1 of 3
 Command ===>

 Select Source to Generate Volume List  . . 2  (1 - Saved list, 2 - New list)
   1  Generate from a Saved List         Query Name To
        List Name  . . COLIN             Save or Retrieve
   2  Generate a New List from Criteria Below
        Specify Source of the New List  . . 1  (1 - Physical, 2 - SMS)
        Optionally Specify One or More:
        Enter "/" to select option      Generate Exclusive list
          Type of Volume List . . . 1          (1-Online,2-Not Online,3-Either)
          Volume Serial Number  . . USER*      (fully or partially specified)
          Device Type . . . . . . .            (fully or partially specified)
          Device Number . . . . . .            (fully specified)
            To Device Number  . . .            (for range of devices)
          Acquire Physical Data . . Y          (Y or N)
          Acquire Space Data  . . . Y          (Y or N)
          Storage Group Name  . . .            (fully or partially specified)
          CDS Name . . . . . . .
                                               (fully specified or 'Active')
 Use ENTER to Perform Selection; Use DOWN Command to View next Selection Panel;
 Use HELP Command for Help; Use END Command to Exit.
or
        Enter "/" to select option      Generate Exclusive list
          Type of Volume List . . . 1          (1-Online,2-Not Online,3-Either)
          Volume Serial Number  . . *          (fully or partially specified)
          Device Type . . . . . . .            (fully or partially specified)
          Device Number . . . . . .            (fully specified)
            To Device Number  . . .            (for range of devices)
          Acquire Physical Data . . Y          (Y or N)
          Acquire Space Data  . . . Y          (Y or N)
          Storage Group Name  . . . SGBASE     (fully or partially specified)
          CDS Name . . . . . . . 'ACTIVE'
                                               (fully specified or 'Active')
You can specify a Volume Serial prefix, a Storage Group Name, or a combination of both.
You need to select Acquire Physical Data, and Acquire Space Data.
Part of the CEA facility service on z/OS, provides the capability for an application to start TSO address spaces, send it TSO commands, and receive the responses. This is used by products lie z/OSMF. You can have a CEA TSO address spaces for a user, as well as a “normal” TSO userid, where you logon and use ISPF.
STATUS: ACTIVE-FULL CLIENTS: 0 INTERNAL: 0 EVENTS BY TYPE: #WTO: 0 #ENF: 0 #PGM: 0 TSOASMGR: ALLOWED: 50 IN USE: 1 HIGHCNT: 0 NO CLIENTS KNOWN TO CEAS AT THIS TIME 12I CN=L700 DEVNUM=0700 SYS=S0W1
You can use the RACDCERT MAP command to map a certificate to a userid, and so avoid the need for specifying a password. Under the covers code uses the pthread_security_np and pass a certificate, or a userid and password, and if validated, the thread becomes that userid, just the same as if the userid was logged on.
Is this secure?
If you store a userid and password on your laptop, even though the data may be “protected” someone who has access to your machine may be able to copy the file and so impersonate you.
With a public certificate and private key, if someone can access your machine, they may be able to copy these files and so impersonate you.
You can get dongles which you plug into your laptop on which you can store protected data. In order to use the data, you need the physical device.
You need to protect the RACF command
Because the RACFCERT command has the power to be dangerous, you need to protect it.
You do not want someone to specify their certificate maps to a powerful userid, such as SYS1. The documentation says
To issue the RACDCERT MAP command, you must have the SPECIAL attribute or sufficient authority to the IRR.DIGTCERT.MAP resource in the FACILITY class for your intended purpose.
For a general user to create a mapping associated with their own user ID they need READ access to IRR.DIGTCERT.MAP.
For a general user to create a mapping associated with another user ID or MULTIID, they need need UPDATE access to IRR.DIGTCERT.MAP.
What’s the best way to set this up?
I think that as part of your process for setting up userids, the process should create the mapping for the certificate to a userid. This way you do not have people creating the mapping. If a mapping already exists, you cannot create another mapping.
You may want an automated process which checks the approval, and issues the commands, and so you do not have humans with the authority to issue the commands.
Of course you’ll have a break-glass all powerful userid in case of emergencies.
But….
Even though the password had expired, I could logon using the certificate. If I revoked the userid the logon failed.
I used certificate logon from z/OSMF and issued console commands. The starts a TSO address space, and z/OSMF passes the commands and responses to the tso address space.
Once a TSO address space has been started, there are no more checks to see if the userid is still valid.
If you want to inactivate the userid, you’ll need to revoke it, and then cancel all the TSO address spaces running on behalf of the userid. Walking someone off site is not good enough. There may be scripts which are automated, and will logon with no human intervention. TSO address spaces may be configured to be cancelled if there is no activity. If the TSO address space is kept busy, (for example by sending it requests) it may never be forced off.
Component TRACE (CTRACE) is the z/OS system trace capability for z/OS components. Most z/OS components use it.
From “capturing a trace” perspective, there are two aspects.
Capturing the trace data
The trace can be an in-memory trace, which is available when a dump is taken. This is is often the default. For example by default a trace is enabled to capture errors, and the in-memory trace is used.
You can have a trace writer started task which writes to a data set. When you start the trace you give the name of the started task. Data is passed to the trace writer job. You can then use the trace data set in IPCS.
Enabling the trace for the component. Usually there are options you can specify, for example all entries, or just error entries and how big the in-memory trace should be.
To trace a z/OS component, you need to know the CTRACE component name, and what you want to trace.
I tried to capture a CTRACE of a z/OS component, and struggled, because I didn’t know the name of the component.
What are the trace component names?
The z/OS command
TRACE STATUS
gave
IEE843I 16.10.22  TRACE DISPLAY 940
        SYSTEM STATUS INFORMATION
 ST=(ON,0001M,00005M) AS=ON  BR=OFF EX=ON  MO=OFF MT=(ON,064K)
 COMPONENT MODE  COMPONENT MODE  COMPONENT MODE  COMPONENT MODE
 --------------------------------------------------------------
 CSF       ON    NFSC      ON    SYSGRS    MIN   SYSANT00  MIN
 SYSJES2   SUB   SYSRRS    MIN   SYSIEAVX  MIN   SYSSPI    OFF
 SYSJES    SUB   SYSHZS    MIN   SYSSMS    OFF   SYSAXR    MIN
 SYSDLF    MIN   SYSOPS    MIN   SYSXCF    MIN   SYSDUMP   ON
 SYSLLA    MIN   SYSXES    ON    SYSUNI    OFF   SYSCATLG  MIN
 SYSTTRC   OFF   SYSTCPDA  SUB   SYSRSM    SUB   SYSAOM    MIN
 SYSVLF    MIN   SYSTCPIP  SUB   SYSLOGR   ON    SYSOMVS   MIN
 SYSCEA    MIN   SYSWLM    MIN   SYSTCPIS  SUB   SYSTCPRE  SUB
 SYSIOS    MIN   SYSANTMN  MIN   SYSDMO    MIN   SYSIEFAL  ON
 SYSTCPOT  SUB
I was after a CEA trace, and from the above, the name is SYSCEA. It is MIN, so is already active.
What is the trace’s status?
d trace,comp=SYSCEA
gave me
COMPONENT     MODE BUFFER HEAD SUBS
-------------------------------------------------------------
SYSCEA        MIN  0002M
   ASIDS      *NONE*
   JOBNAMES   *NONE*
   OPTIONS    ERROR
   WRITER     *NONE*
So it is active, capturing errors, and writing to the in-memory trace (because there is no WRITER). I recognised the options as the defaults in parmlib member CTICEA00.
I had managed to mess up the files for a product, so I wanted to copy them across from an older system.
This worked for some of the files – but when I came to start the subsystem – it was missing some files! For example /u/my/zosmf/liberty/lib/native/zos/s390x/bbgzsrv
I copied the files across again – and they were still not there!
Once you know the answer it is obvious…
There is a directory /usr/lpp/zosmf/liberty – and it was this directory that was missing.
Once I looked into it more carefully – this was not a directory, but a symbolic link to another directory liberty -> ../liberty_zos/current
To fix this I used
# go to my version of zosmf
cd /u/my/zosmf
# remove the symbolic link
rm liberty
#make the new link
ln -s  /usr/lpp/liberty_zos/current     liberty
and now I could use ls /u/tmp/zosmfp/liberty/lib/native/zos/s390x/bbgzsrv and it found the file.
If I had checked this before I started, I would have save myself a half day of IPLing older systems!
I have a userid on a z/OS production system, which does not support FTP. To run my tests, I needed to get some files on to this system. Getting the files there was a challange.
The 3270 emulator has support for transferring files. It uses the IND$FILE TSO command to send data packaged as 3270 datastream As far as I can tell, this only works with data sets, not Unix files.
Creating a portable file from a data set.
You can package a data set into a FB Lrecl 80 dataset using the TSO XMIT (TRANSMIT) command.
Create a portable dataset from a Unix file.
On my home system I created a PAX dataset from a file in a Unix directory.
Use cd to get into the directory you want to package. If you specify a file name like /tmp/mypackage, the unpax will store the output in /tmp/mypackage which may not be where you want to store the data.
If you use relative directories such as ‘.’ it will unpax into a relative directory. I used the cd command to get into my working directory
You need both the single and double quotes around the data set name.
This created a data set with record format FB, and Lrecl 80.
A 360 MB file became a 426 CYL data set.
If you run out of space ( B37-04 abend). Delete the dataset before you reissue the pax command, otherwise the space parameters on the pax command are ignored; and increase the amount of space in the pax command.
I FTPed this down to my Linux machine in binary mode.
Send the file to the remote z/OS over 3270 emulator
Because FTP was not available I had to use the TSO facility IND$FILE. One of the options from the “file” menu was “File Transfer”.
You fill in details of the local file name, the remote data set name, and data set attributes.
In theory you need to be in TSO option 6 – where you can enter TSO commands, but when I tried this I kept getting “input field too small”. I had to exit ISPF and get into native TSO before the command worked.
The transfer rate is very slow. It sends one block at a time, and waits for the acknowledgement. With TCP/IP you can send multiple blocks before waiting for the ack, and use big blocks. For a 300MB file, I achieved 47KB per second with a 16000 block size – so not very high.
With IND$FILE, pick the biggest block size you can. I think it supports a maximum size of 32767. I got 86 KB/second with a 32767 block size with DFT mode.
For a dataset packaged with TSO XMIT
Use the TSO command RECEIVE INDSN(…) to restore the data set.
Un PAX the file to recreate it
On the production system, I use went into Unix, and used the cd command to get to the destination directory.