Due to some random typing, when I try to edit a member I keep getting
IKJ56500I COMMAND M NOT FOUND
Macro does not exist
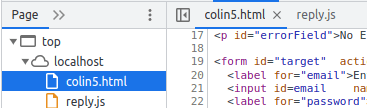
After some playing around, I found this was caused by having a list of PDS members, using the prefix command E, and putting something(M) in the Prompt column.
To fix it, use E and put / in the Prompt column. This gives the EDIT Entry Panel and shows Initial Macro..M . Blank out the M, and press PF3 to clear it.
Easy when you know how.
I expected this to show up under ISPF 2 (Edit) but the initial Macro field was blank.
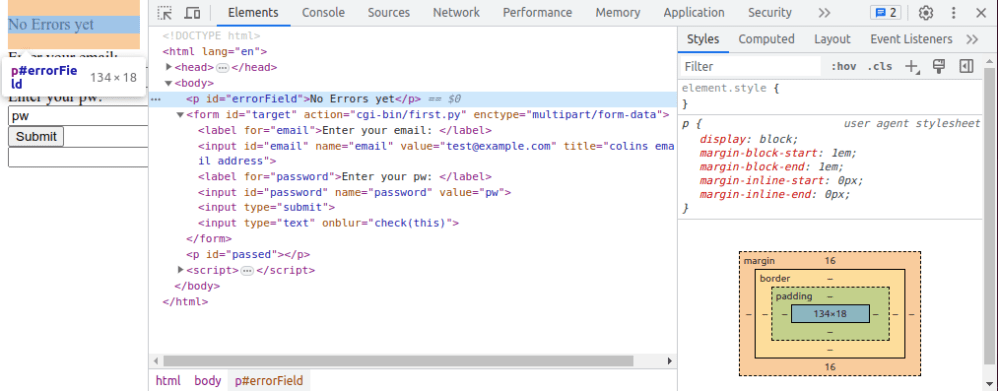
I had an HTML page with javascript and wanted to debug it and see what was going on. It was all pretty easy, but some things took a while to understand. I’ll describe some of the things I did using Chrome browser. Firefox has similar capabilities.
Elements – you can see the HTML components. As you move your mouse over the elements in the list, the fields in the web page are highlighted
Sources – you can see the source of the program with the javascript etc. Errors in the file will get flagged on this page
“Debug” switch. The icon next to it is the “step over”
“Watch” – You can specify which variables you want displayed permanently
“Scope” you can list and display all the variables available to you at that point in the web page
An example of the source
Display and edit the HTML
Clock on the Elements tab (2 in the above picture) to display the source.
You may have your javaScript within the page, or referenced by http://./reply.js. You can see these under the page sub tab, or as a tab in the source (7). You may have to click on the name on the “Page” tab, to get it displayed in the source pane.
This shows sssserver.html is the main one, and checkCipher.js has been included. Some of these may be displayed as tabs above the sourc
It gives a good high level view of the program for example it may have <head>…</head>. The … show there is omitted content. Click on the … to display the content.
As you move your mouse over the HTML the web page elements will be highlighted. Moving over the <body> shows the whole web page, moving over a <p> shows just the paragraph.
As you click on some html, it displays the CSS on the right had side.
It tells you what CSS is being used for example the “p” tag with option “display”:block
As you move your mouse over the CSS picture it highlights the data on the html page
You can edit the HTML, add elements, delete elements etc
Set breakpoint
Click on the Sources (3) tab
Click on the line number of interest – it toggles blue.
Run the page
Step through the code
Click on the Sources (3) tab.
Click on the pause button (4); it gets grayed out
Run your script. I clicked the submit button.
The display changes and it shows “Debugger paused”.
Open the “watch” twistie and click “+”. You can now enter a variable name to display the object.
Open the object’s twistie to display the attributes of the object
Open the “Scope” twistie. Open the “Local” twistie. This will display all of the local variables. Open the variable’s twistie to see all its attributes. I do not think you can change the data. Use ctrl+alt+left mouse to expand or compress the twistie.
Open the “Breakpoint” twistie and select “Pause on uncaught exception” and “Pause on caught exception“. This will stop when it detects a problem
If you click the icon next to the Pause Icon (or F10) it will step through the code.
If you click on a line of javascript and use right-click you select “Continue to here”.
Within an active code segment, hovering over a variable will display the attributes. (You can also go to “Scope” and display from that window. Clicking on the window object( for example) gives all the operations you can do on that object (for example all of the on…. method names) .
If your code has console.log(“something”) this will appear in the console tab.
To get out of the current debug press the browser’s stop (X) and browser’s “reload/refresh” button.
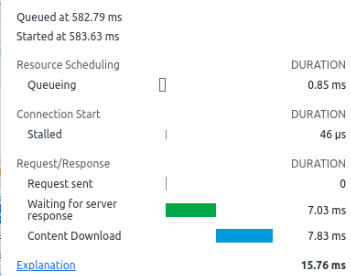
Where did it spend its time?
If you click on the “Network” tab it shows where time was spent on the network. For example which files were got, and how long it took to get the data. It gives information on
Which file was loaded.
Status – 200 is OK.
Type eg .gif.
Initiator – which page did the request come from.
Size ( if it was downloaded) or “cache” if it was already in the browser cache.
Time in milliseconds.
“Waterfall” breaks down the time spent
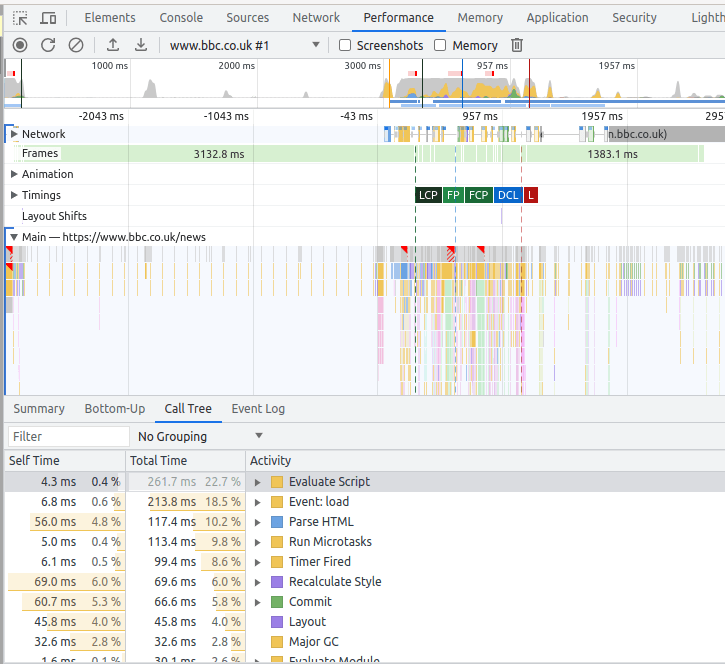
Under the “Performance” tab you can record the activity, and display it.
Use Control+E to start, then Ctrl+E to stop it.
It displays information like
What do all of the keys do?
If you click on the settings wheel, and select Shortcuts, it displays all the options and key combinations.
Debugging a java script file?
Chrome caches these. Disable this by going to the Network table and click on “disable cache”
When writing HTML pages which include fields where users can enter data, you usually want to validate the input. Having checks in your html may be good – but someone could use a REST API url and send data directly to the back-end, and bypass your checks. This means that as well as field checking in your panels, you also need field checking in the back-end before doing any data updates.
The flow of logic for a web server application is
display an html page with input fields for user to complete. There may be input fields(possibly read only) with defaults pre-supplied, there may also be ‘input’ fields which have a value, are read only ,and not displayed. This allows you to pass “constant” data to the server, via the URL.
The back-end request is submitted.
The back-end application:
Validates the parameters. These checks may be more stringent that the HTML validate, for example it may lookup a value in a database rather than just checking it is numeric . If a request, such as a REST API request, arrives, the parameters will not have been checked.
Augments any data, for example add constant values, or system wide data.
Transforms any data, for example change a string option to a numeric option as needed by the service.
Calls the service, such as database insert
Passes a response back to the caller, possibly in JSON format, giving
Return code
Any error message
Any field in error
The front end displays any error messages, and positions the cursor in the first field with a problem.
readonly – the user can see it, but cannot change it. You can preset this with value=… .
type=hidden, can be used with value to pass a value to the back end that the user cannot see it on the page.
title – produces hover over the field so you can provide a description of the expected format.
you can define radio buttons, pull down lists, or multi choice selection.
Javascript validation
When the user takes an action, for example pressing a submit button, or changing the value of a field, you can drive a Javascript script.
This can do more complex checking of values. The onfocus=focusfunction(this) invokes the focusfunction when field gets focus (you put your cursor into the input box) (not very useful). The onblur=blurfunction(this) gets control when you move away into another field (much more useful)
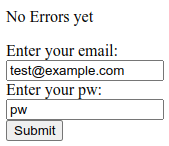
The invoked page was file:///home/colinpaice/tmp/c2.html
The parameters start after the ?
Parameters are split at the & sign
Some characters are converted to their hex value; for example & and blanks. This is done so the string can be unambiguously parsed.
I have a useful page which processes any parameters and displays them within the page
<!DOCTYPE html PUBLIC "-//W3C//DTD HTML 4.01 Transitional//EN"
"http://www.w3.org/TR/html4/loose.dtd">
<HTML lang="en">
<HEAD>
<script>
  function js_onload_code (e){
    var url = document.location.href;
    alert("colin:"+url);
    var p = url.split('?')[1]; // any parms
    if (p)  // there is a parameter
    {
       var params = p.split('&');
       if (params) // we have at least one parameter.
       {
         var l = params.length;  // number of them
         for (var i = 0 ; i < l; i++) {
            tmp = params[i].split('=');
            document.write(tmp[0] + "=" + tmp[1] +  "<br>");
         }  // for
      } // if params
  } // function
 window.onload= js_onload_code ();
</script>

<TITLE> Invoked page</TITLE>

</HEAD>
<BODY  >
<p>Parameters passed in</p>

</BODY>
</HTML>
When this page is executed,
window.onload= js_onload_code (); says when this page is loaded execute the script. Within the script..
var url = document.location.href; gets the URL string
var p = url.split(‘?’)[1]; split to get any parameters. Take the URL, split it at ? and take the second value (for zero based, 0 is the first element, 1 is the second element)
...split(‘&’); split the keyword string at the “&”
var params = p.split(‘&’); create an array of strings split at the &
var l = params.length; count the number of strings produced by split(‘&’)
for (var i = 0 ; i < l; i++) { tmp = params[i].split(‘=’); document.write(tmp[0] + “=” + tmp[1] + “<br>”); } for each string – split keyword=value, and insert it into the page.
Server side checking
For a table using method=”get” the parameters are passed in the URL as show above.
For method=”post” data is passed via stdin, and the server application has to read the data. Depending your backend application you may have to write special code. Python handles post and get with no difference in code. You have to write code for Rexx to handle POST.
The server processing is
Validates the parameters. These checks may be more stringent that the HTML validate, for example it may lookup a value in a database. If a request, such as a REST API request, arrives, the parameters will not have been checked.
Augments any data, for example add site wide data value, or system specific data
Calls the service, such as database insert
Passes a response back to the caller, possibly in JSON format, giving
Return code
Any error message
Any field in error
Python program can pass data such as lists, and dictionary to external routine.
Rexx program communication is done using a command string. You can separate fields by a delimiter, and then parse the input string. As the URL passed in as a format url?kw1=v1&kw2=v2&… you could pass that string through to external routines.
You may want to have common routines for checking values. These would need to be outside of the server program, so they can be shared. You might parse the url passed to the server program into Rexx variables
kw.1=”userid, value.1=”colin”,
kw.2=”password”,value.2=”passw0rd”
then have logic like
do I = 1 to number_of_inputs
  if kw.i = "userid" then rc  =checkuid(value.i)
  else if kw.i="password" then rc = "checkpw(value.i)
  ...
end
You might have to have multiple passes of the data so you get userid, and password, and then issue
userid = ""
password = ""
do I = 1 to number_of_inputs
  if kw.i = "userid" then userid = value.i
  else if kw.i="password" then password= value.i
  ...
end
rc = checkpw(userid,password)
Where rc could be in a string of format “rc value”
and
rc =0 – use the returned value
rc!=0 – error detected. The value is an error message. Pass it, and the field name, back to the caller
If you want to add “constant” data
create
number_of_inputs =number_of_input + 1
n = number_of_inputs
kw.n="zos"
value.n="ZOS1"
You can then build a string similar to the original input from the kw… and value… values.
There is a lot to consider for a simple little application!
I’ve been using the internet for over 30 years – using “gopher” before web browsers were invented, and I assumed I knew how web pages worked. I’ve had a steep learning curve to get a simple html application talking which talks to a back end server, to work. I also want to invoke the back end service from a REST API request. I thought this should not take me more than an hour or two. Ha Ha – I never learn that these simple things, always takes longer than you thought.
If there is an easier way to update my page from the back-end, please tell me.
My expectations
Having worked with CICS BMS maps, ISPF panels and IOS3270, I was expecting the application model where the layout and the data are separate. You send down the boiler plate layout of the data, and then send down the data in the format of label = data. The display manager then merges the data into the correct field in the boiler plate. This allows you to use different boiler plates, without changing your application, and helps preserver data isolation.
If seems that the HTML model is that you build up the data stream as you go along, (merging boiler plate and data at generation time) so you use
to put “Colin” in the field. At a naive level it looks very simple, but it merges display with data, and makes it harder to maintain and update.
What I wanted
I want the front end display to look like
to display (after the submit button is pressed)
Some useful information.
When you give a URL such as http://mysite/mypage?parm1=abc&parm2=zyz&parm3=99, the page or program can process the keyword=value pairs after the ? and delimited by &. You can write a page and pass these parameters, so the page can display these values. This can provide the application model of “here is the boilerplate of the layout, and here are the data to go in the fields”.
HTML options
The easy bit – the anchor tag
Within an HTML page you can have code like <a href=”colin.html”>colins link</a. This displays the text colins_link, and if you click on the text it goes off and displays page “colin.html” from the same directory as the current page. This tends to be used when displaying information, with no input from the end user.
The almost easy bit – using a form
If you want the end user to provide information, you can use the <input>…</input> tag for example
id can be used to reference this field from a script within the page
name – is passed with the data to the back end server
value – you can preset a value.
You typically have a “submit” button or similar to send the data in the input fields to the next stage.
Typically you put these input fields in a form. You can set up event handlers, so when the user presses the “submit” button, scripts are run in the page to validate data before it is sent off.
Using forms – still pretty easy
Using forms is more complex than a simple anchor page and link to another page.
A form can have
action=url. The request is sent to the given url. This may just be another html page, or it may be a script which processes data in the request.
method=post|method=get. Method=post is used for transactional type work (make a database update) . Method=get tends to be used for non transactional request, (no changes made in the backend).
method=get
With method=get, the input data is appended to the action URL ,so a request may be colin.html?userid=colin&password=passw0rd. This can be seen in URLs.
method=post
With method=post, the data is read from stdin in the backend application. It is not in the URL.
In the HTTP section of a wireshark trace,
and followed by
I want the back-end to update my front end page – this suddenly gets hard!
My application scenario is
The end user is presented with an HTML page, the data is sent to the back-end server. Some validation is done, and a response is sent back to the requester.
The back end can return
Headers which say redirect (status 303); display a specified URL, and pass it some parameters. The web browser can then go and get the page , display it, and used the passed field values to update the display.
Display HTML. You could build the html, and include any variable data as you build it, and send the whole stream of data.
Other data, such as a JSON object, eg {“rc”:”ok”,”field”:”password”,”msg”:”this is the problem”}
A file or other data to download – rather than display
You can also return headers giving security information or meta data about the payload.
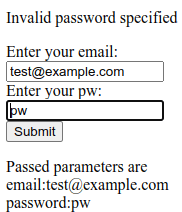
My back-end application wants to report a parameter error to the requester – how do I do it?
I want to report an error the the end user, and have the cursor in the field with the problem. The front end and back end are isolated from each other which makes this hard.
I cannot just return some html data, as it will replace what is currently displayed. I know the link which called my back end (the “referer” header), but do not know the field names, or what other processing was done before my back end was called, I cannot just say redisplay it.
The only way I could find was to pass back some JSON data, for example in the format {“rc”:”error”,”field”:”password”,”msg”:”there is the problem”} and have some complex logic in the front end to process this.
I’ll skip over some magic, for a moment, for getting the data back to the front end page. The request gets sent, and the front page waits for the response. The front page extracts the JSON response and processes it…
Check the status code is OK, and that there were no errors reported by the back-end (for example file not found, or logic problem in the script).
Update the error message field
The returned JSON has a field “msg:…..” which can be referenced as json.msg .
Have a field in the front end page like <p id=”errorMessage“>No error messages yet</p> .
Update the error message field (with id “errormessage”) in the document from a field in the JSON using JavaScript document.getElementById(‘errorMessage‘).innerHtml = json.msg. The id=.. field links these up.
The data passed to the back end was a series of ?fieldname1=value1&fieldname2=value2&fieldnam3=value3... . The back-end puts the field-name in error into the JSON “field” attributes. The script in the front page:
Extracts the “field:…” from the JSON.
Gives focus to the field name taken from the JSON.field and uses document.getElementById(json.field).focus(); to give the field the focus, and so position the cursor in the field.
The magic to trap the response from the back-end – the advanced topic.
The only way I found find of capturing the json data passed back from my server application was some complex coding.
Within the code below is the use of Promises, a way of handling asynchronous requests. Rather than a deeply nested set of if-then-else, it uses a sequence of .then(itworks_callback, error_callback). The returned value of the itworks_callback is passed to the next .then(…,…).
The .then((aobject) => ... is passed an object (aobject) which is passed into an inline function which extracts the json payload and passes it to the next .then statement. In the second “.then” , “b” gets the aobject.json data.
Within the <body..</body> of my html page I had displayable fields
<script>
document.forms["target"].addEventListener('submit', (event) => {
event.preventDefault();
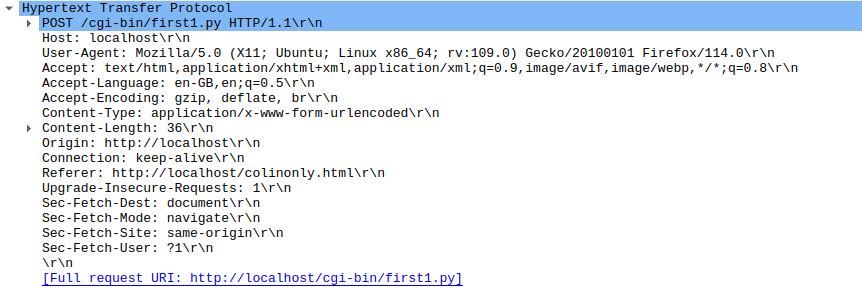
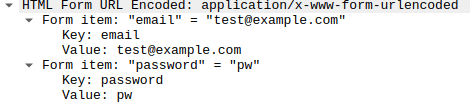
fetch("cgi-bin/first.py", {
method: 'POST',
body: new URLSearchParams(new FormData(event.target)) // event.target is the form
}).then((response) => {
if (!response.ok) {
throw new Error(`HTTP error! Status: ${response.status}`);
}
// for (var pair of response.headers.entries()) {
// console.log("31:"+ pair[0]+ ': '+ pair[1]);
// }
return (response.json();
})
.then(function(result)
{
// set the focus to the value returned
document.getElementById(result.field).focus();
// update the fields on the page
document.getElementById('errorField').innerHTML = result.msg
document.getElementById('passed').innerHTML = result.passed;
}).catch((error) => {
errorField.innerHTML = error;
console.log(error);// TODO handle error
return(error);
});
});
</script>
The script does
document.forms[“target”].addEventListener(‘submit’, (event) => set up a handler for the form with id “target”, for when the form is submitted, and set the variable “event” to the parameter object.
event.preventDefault(); Do not do the default – I want to process it.
Send the data off to the url cgi-bin/first.py and wait for the response
fetch(“cgi-bin/first.py”, {
method: ‘POST’,
body: new URLSearchParams(new FormData(event.target)) // event.target is the form
}).
then((response) => { the result of the fetch is passed to an inline function, with object called response.
Handle any errors
if (!response.ok) {
throw new Error(`HTTP error! Status: ${response.status}`);
}
Display the header records from the response … commented out
// for (var pair of response.headers.entries()) {
// console.log(“31:”+ pair[0]+ ‘: ‘+ pair[1]);
// }
return (response.json(); Pass on the json payload to the next .then statement
})
.then(function(result) This is passed the json data and stored in result.
{
// set the focus to the value returned
document.getElementById(result.field).focus(); Extract the field name from the json and set the focus to the field
// update the fields on the page
document.getElementById(‘errorField’).innerHTML = result.msg This is the error message field.
document.getElementById(‘passed’).innerHTML = result.passed; And provide some feedback information , which is the parameters passed to the backend.
}).catch((error) => {
errorField.innerHTML = error;
console.log(error);// TODO handle error
return(error);
});
});
Phew! What a lot you need to understand to just pass back the return code, and error message! I could not find an easier method. It may exist… but it is not well documented.
I had just install Apache Httpd server, and found the documentation had some useful Useful FireWall (ufw) commands, which makes it even easier to configure ufw.
ufw app list
The ufw documentation says
ufw supports application integration by reading profiles located in
/etc/ufw/applications.d. To list the names of application profiles known to ufw, use:
ufw app list
Users can specify an application name when adding a rule (quoting any profile names with spaces). For example, when using the simple syntax, users can use:
ufw allow <name>
Or for the extended syntax: ufw allow from 192.168.0.0/16 to any app <name>
My commands
ufw app list
gave me
Available applications:
  Apache
  Apache Full
  Apache Secure
  CUPS
  OpenSSH
  Postfix
  Postfix SMTPS
  Postfix Submission
sudo ufw allow ‘Apache’
gave me
Rule added
Rule added (v6)
sudo ufw status gave me
Status: active

To                         Action      From
--                         ------      ----
Anywhere                   ALLOW       10.1.1.2
...
Apache                     ALLOW       Anywhere
...
Apache (v6)                ALLOW       Anywhere (v6)
I had clearly configured http on z/OS, as when it started it printed Colins startup, but I could not find where this was being executed from.
I eventually found it was in the home directory for httpd. My http server starts with PARM=’SH /usr/lpp/ihsa_zos/bin/apachectl…’. In /usr/lpp/ihsa_zos/bin/envvars are the magic startup parameters, including some gsktrace settings.
Putting the GSK_TRACE information in this file is not recommended as it will trace every system SSL call, and to turn it off, you have to stop http, edit the file to say GSK_TRACE=0x00 and restart the server. This article describes how to collect a trace using CTRACE. You can turn trace on and off without restarting the HTTP server.
To format this gsk trace I had to use the following command in Unix Services
I had a problem getting the httpd server to work on z/OS. It did not like my certificate – but reported messages about ICSF security not being set up. I got to learn a lot about traces, but could not find how to trace System SSL (GSK) and httpd.
I specified SSLTRACE in my vhost*.conf file which gave me a little information – but not at the System SSL Level.
Other applications using System SSL, can set environment variables
GSK_TRACE=0xff
GSK_TRACE_FILE=/tmp/gskssl.%.trc
but this does not work with http. (I think the environment variables are not passed on to any spawned thread).
You have to use the gsksrvr task, and collect the trace through CTRACE.
TRACEOPTS
          WTRSTART(ctwtr)
          on
          wtr(ctwtr)
jobname(httpcp)
          OPTIONS('LEVEL=255,JOBSUFFIX=ANY')
I start my http server with the S HTTPCP command, and specified httpcp in the jobname of the parmlib.
I got out no trace. I tried the various jobnames until it produced a trace. My trace was produced from jobname httpcp8! I could not find a way of displaying which of my httpcp* job was used, so I had to try them all.
If I had had a long name eg httpcpxx then specifying jobname(httpcpxx) should have worked.
Starting the trace
I used
TRACE CT,ON,COMP=GSKSRVR,PARM=CTGSKON
where my parmlib member was CTGSKOK
It produced
TRACE CT,ON,COMP=GSKSRVR,PARM=CTGSKON IEE252I MEMBER CTGSKON FOUND IN USER.Z24C.PARMLIB GSK01040I SSL component trace started. ITT038I ALL OF THE TRANSACTIONS REQUESTED VIA THE TRACE CT COMMAND WERE SUCCESSFULLY EXECUTED.
When I ran my test, some System SSL messages were produced on the console from the gsksrvr address space
GSK01047I SSL component trace started for HTTPCP8/STC01000. GSK01050I SSL component trace started for HTTPCP8/STC01000/05010022.
Stop the trace
TRACE CT,OFF,COMP=GSKSRVR
Wait until you get
GSK01041I SSL component trace ended.
from the gsksrvr address space, and stop the trace writer.
D TRACE,WTR=ALL
TRACE CT,WTRSTOP=CTWTR
This seems to take a few seconds to run. It outputs
IEF196I AHL904I THE FOLLOWING TRACE DATASETS CONTAIN TRACE DATA :
IEF196I           IBMUSER.CTRACE1
ITT111I CTRACE WRITER CTWTR TERMINATED BECAUSE OF A WTRSTOP REQUEST.
IEF404I CTWTR - ENDED - TIME=08.40.21
Format the trace
You need to use IPCS to format it
=0 – and enter the data set name (IBMUSER.CTRACE1)
=6 – to get to the ipcs command screen
dropd – to tell IPCS to forget any historical information it may know about for the dataset
CTRACE COMP(GSKSRVR) full – this displays any System SSL CTRACE data
m PF8 – go to the bottom of the data
report view – to go into ISPF View mode on the data set
X ALL – to hide all of the data
f SSL_ERROR ALL – this shows any error codes
if you get any lines displayed, you can tab down to the hidden command and use the line prefix command f4 to display the first 4 hidden lines.
The errors I got were
 S0W1      MESSAGE   00000004  08:35:55.049451  SSL_ERROR
   Job HTTPCP8   Process 05010022  Thread 00000005  crypto_ec_token_private_key_sign
   ICSF service failure: CSFPPKS retCode = 0x8, rsnCode = 0x2b00

 S0W1      MESSAGE   00000004  08:35:55.049733  SSL_ERROR
   Job HTTPCP8   Process 05010022  Thread 00000005  crypto_sign_data
   crypto_ec_sign_data() failed: Error 0x03353084

 S0W1      MESSAGE   00000004  08:35:55.050012  SSL_ERROR
   Job HTTPCP8   Process 05010022  Thread 00000005  construct_tls13_certificate_verify_message
   Unable to generate certificate verify message: Error 0x03353084

 S0W1      MESSAGE   00000004  08:35:55.050393  SSL_ERROR
   Job HTTPCP8   Process 05010022  Thread 00000005  send_tls13_alert
   Sent TLS 1.3 alert 51 to ::ffff:10.1.0.2.45432.
The Alert 51 matches what my browser received.
File /usr/include/gskcms.h had #define CMSERR_ICSF_SERVICE_FAILURE 0x03353084
User action: You might need to re-create the token by using the PKA key token build or PKA key import callable service or regenerate the key values on another platform.
or in other words, it did not like my certificate created with NISTECC SIZE(256) but did like NISTECC SIZE(521).
I had a problem with a certificate and as part of trying to track down the problem, I traced all of the components. I found the documentation for tracing ICSF was not complete – it assumed you were going to take a dump.
You can collect a CTRACE from ICSF, and have it go to a CTRACE dataset.
Create the CTICSFxx member in parmlib
I copied CTICSF00, added the writer statement, and said collect ALL
TRACEOPTS
          ON
          BUFSIZE(2M)
          wtr(ctwtr)
          OPTIONS('ALL')
You need a parmlib member to contain the definitions I called mine CTICSF01
TRACEOPTS
/*-----------------------------------------------------------------*/
/*   ON OR OFF: PICK 1                                             */
/*-----------------------------------------------------------------*/
          ON
/*        OFF                                                      */
          BUFSIZE(2M)
          wtr(ctwtr)
/*-----------------------------------------------------------------*/
/*   OPTIONS: NAMES OF FUNCTIONS TO BE TRACED, OR "ALL", OR "MIN"  */
/*-----------------------------------------------------------------*/
/*        OPTIONS(           */
/*                'ALL'      */
/*               ,'KDSIO'    */
/*               ,'CARDIO'   */
/*               ,'SYSCALL'  */
/*               ,'DEBUG'    */
/*               ,'RDIO'     */
/*               ,'RDDATA'   */
/*               ,'MIN'      */
/*                )          */
           OPTIONS('KDSIO','CARDIO','SYSCALL','RDIO','ALL')
Start the trace
TRACE CT,ON,COMP=CSF,PARM=CTICSF01
This gave me
TRACE CT,ON,COMP=CSF,PARM=CTICSF01 IEE252I MEMBER CTICSF01 FOUND IN USER.Z24C.PARMLIB ITT038I ALL OF THE TRANSACTIONS REQUESTED VIA THE TRACE CT COMMAND WERE SUCCESSFULLY EXECUTED.
Run your failing transaction
Stop ctrace
TRACE CT,OFF,COMP=CSF
This gave
ITT038I ALL OF THE TRANSACTIONS REQUESTED VIA THE TRACE CT COMMAND WERE SUCCESSFULLY EXECUTED.
Stop the trace writer
TRACE CT,WTRSTOP=CTWTR
This gave messages
ITT111I CTRACE WRITER CTWTR TERMINATED BECAUSE OF A WTRSTOP REQUEST. IEF404I CTWTR – ENDED – TIME=07.54.33 IEF196I IEF142I CTWTR CTWTR – STEP WAS EXECUTED – COND CODE 0000 IEF196I IGD104I IBMUSER.CTRACE1 RETAINED
Any data is in the dataset.
Go into IPCS.
The instructions below show how to find statements with a non zero return code.
=0 – and enter the data set name
=6 – to get to the ipcs command screen
dropd – to tell IPCS to forget any information it may know about for the dataset
CTRACE COMP(CSF) full – this displays any ICSF CTRACE data
m PF8 – go to the bottom of the data
report view – to go into ISPF View mode on the data set
X ALL – to hide all of the data
f code all – this shows any error codes
c ‘Return code = 00000000 ‘Return ZZZZ = 00000000’ all – use cut and paste of the string, as blanks are lost in this post
c ‘Condition code = 00000000’ ‘Condition ZZZZ = 00000000’ all
x all
f code all – this will show you are statements with a non zero return code.
Certificates can be used as an authentication mechanism. It allows identity information to be sent over a network, and the remote end to validate the information before using it. For this to work, we need a “Certificate Authority” who can validate the certificate. When the remote end gets the “certified certificate” it checks the certification and validity and if successful can use this. Checking can involve sending an electronic request to the Certificate Authority asking if the certificate is still valid.
What is a certificate?
A certificate has several components (conceptually I think of a certificate as an envelope with several bits of paper within it).
Information about the owner, such as name and address or organization
Meta information – such as it can be used for document signing (but not certificate signing), and validity dates.
Signing information.
Information about the owner
A certificate has information about the “owner”. Common attributes include
Common Name CN=Colin Paice
Organisation O=My Org
Organisational Unit OU=TEST
Country C=GB
Meta information.
The certificate contains information on how it should be used. For example
This certificate can be used as a server’s certificate – but not as a client certificate.
This certificate can be used for signature but not encryption.
This certificate can be used to sign other certificate (see below).
A server (or client) could decide to ignore some of these attributes. A proper server will honour the information, and if the client’s certificate does not have the “can be used by a client” attribute set, it will reject the certificate.
How do you trust a certificate?
If you have been sent a certificate – how do you tell if it is genuine? This was one of the problems in the early days of secure communications.
This problem was solved by having an organisation we both trust, and having this organisation “sign” a certificate.
Imagine there is a UK Certificate Authority (UKCA). To get your certificate approved…
you take your certificate, your passport, and proof of address to the Certificate Authority (UKCA).
A clerk in the CA, checks that the name in your certificate matches your passport, and the address in the certificate matches the proof of address your provided.
The clerk can check “the permissions” within your certificate, such as this certificate can/cannot be used as a certificate authority, or can/cannot be used as a server. The CA may not care!
The CA take an electronic copy of your certificate and perform a checksum calculation on the contents. If the certificate is changed in any way, the checksum calculation will be a different number.
The CA then encrypts the checksum calculation, prints it out, and staples the encrypted value and a copy of the CA’s public certificate to the back of your certificate.
The certificate has now been signed by the CA.
You send me a copy of your certificate and attachement created by the CA.
When I get a copy of your certificate (and attachment),
I check the CA’s public certificate that you sent me is the same as the copy I already have.
I do the same check sum calculation as the CA authority did.
I use the CA’s public certificate to decrypt the CA’s encrypted checksum.
The two checksum values should match!
If the checksum values match, then I can trust that the information in the certificate is the same as the information you showed to the CA when getting you certificate “signed”. Of course if you provided a fake passport, all I know is that what I see is what the CA saw.
Intermediate CAs and certificate chains
Of course it costs you money to get your certificate signed by a CA. To reduce this cost you can set up your own enterprise Certificate Authority. You create a certificate called CN=MYORGCA, and set the attribute set to allow it to sign other certificates. You take this the the UKCA and get it signed.
When Joe wants his personal certificate signed, he come to you,
you check Joe’s corporate ID badge has the same name as in Joe’s certificate
you check any other data fits within your enterprise standards, such as expiry date.
you use your enterprise CA certificate(CN=MYORGCA) to sign Joe’ certificate.
Joe get a package with
Joe’s certificate,
the checksum from the enterprise signing, and the enterprise public certificate.
a copy of the UKCA’s certificate and encrypted checksum for your enterprise’s CA.
When I get Joe’s certificate and attachments.
I can see if I have a copy of your enterprise public certificate.
No I do not, but I do have a copy of the UKCA public certificate,
I validate the your enterprise’s public certificate, using the UKCA certificate
If your enterprises public certificate validates successfully, I can then use it to validate Joe’s certificate.
This means I can validate certificates sent to me, as long as I have at least one of the certificates in the chain.
You could take this further and have a departmental CA authority.
Is the certificate still valid?
If someone leaves your organisation you want to ensure that any certificates issued to that person cannot be used.
You can have an expiry date in the certificate, so within a year or two the certificate will expire. This is not good enough, and you want to make the invalidate the certificate as soon as possible. This can be done through an Online Certificate Status Protocol (OCSP) attribute in the certificate. Basically this says go and ask the URL if this certificate if it is still valid. How do you know who to ask? A certificate has url information within in it Authority Information Access: OCSP – URI:http://ColinsCert.Checker.com/ . The back end serving the URL is typically an LDAP server.
If you think about this for a few minutes this may not seem a good idea. For every secure connection handshake, you have to issue a query to a remote server somewhere to see if the certificate is still valid. This will seriously affect performance. This was solved by having a “OCSP response valid time”, sent as part of the response from the OCSP server. This known as stapling (I picture this as stapling a valid-until ticket to a certificate). The OCSP server can say “This certificate is valid, and assume it is valid for n hours”. The first time the client uses the certificate it may take longer because of the OCSP checks. For successive requests , the client can then use the certificate without doing any OCSP checks – until the time period has expired.
Do I trust the sender?
A bad actor could have copied the certificate from a valid server, and presented it to the client. The client checks it, and it looks ok, but in reality it came from a bad server.
You can include Subject Alternate Name (or SAN) in the certificate. This is the URL or IP address of the server. When the certificate is sent from the server, the client checks that the IP address of the server is in the list of SANs in the certificate. If it does not match then the certificate is rejected. Example SANs DNS:www.example.com, IP:10.1.1.2
If the DNS:name is used, this will also require a connection to a DNS to get back the IP address, which will add time to TLS hand shake to the server.
You should use SAN for the server, but not for the client. A Server will have a fixed, or limited choice of values. A client can get a random IP address and so is unlikely to match a value in the certificate.
This topic is part of the “one minute” series of posts, which give an overview of a topic with enough information to be able to understand the concepts without going too deep.
You may have a banking application on your phone which you use to communicate with the bank’s server.
Setting up a secure connection
There are several parts to establishing a secure connection:
You need to ensure the back-end your application is connecting to is really to your bank – and not a bad actor’s system.
The bank needs to check that you are who you say you are – and not a bad actor impersonating you and trying to steal your money.
Agree what cipher techniques you will use so a bad actor cannot read your traffic
Some integrity techniques so you can be sure what you send to the bank is the same data as received by the bank, and a bad actor has not replaced your traffic with some evil traffic.
All the parts above reply on encryption and decryption
Introduction to encryption and decryption.
The basic concept of encryption is you have plaintext data, a function, and an encryption key. (I think of a sausage machine, into which you plug a specially shaped key). You feed the plaintext data into the function+key and out comes encrypted data.
The basic concept of decryption is to take the encrypted data, pass it through a function and the decryption key, and out comes the original plaintext.
For some encryption, the encryption key is the same as (or similar to) the decryption key. For example Change the letters A -> P, B -> $, C -> 9…. in this case if you have the encryption key, it is easy to determine the decryption key ( P -> A, $ -> B, 9 -> C). This simple technique is not very strong, it is easy to break and find the encryption/decryption key.
There are some mathematical functions that make it very hard to find the inverse key. Even if you know the encryption key – you will not be able to guess the decryption key. (You may not be able to guess, but large governments with limitless computer resources may be able to find the decryption key). These keys tend to be very large numbers with 100’s of digits.
Public and private keys
As described above you have an encryption key, and a different decryption key. Pick one, and make it generally available to the general PUBLIC. Keep the other key very PRIVATE – because anyone with this private key can decrypt the data. Hence PUBLIC and PRIVATE keys.
If you have some data and encrypt it with my PUBLIC key. Only someone with my PRIVATE key can decrypt it. Knowing the public key does not allow you to decrypt it.
If I have some data, and encrypt with my private key, then anyone with my public key can decrypt it. So what – every one has access to my public key. If my public key decrypts the data you know that it came from me (or someone with my private key). This statement is important; it is worth reading the statement again.
If you have a private/public key pair, and I have a public/private key pair we can do interesting things:
I encrypt with my private key, and then encrypt with your public key. Then only you can decrypt it (with your private key), and then you decrypt with my public key – so you know it came from me – and only you can read it.
You encrypt with my public key, then your private key. I can decrypt it with your public key (and so I know it came from you), and then I decrypt with my private key to get the original message and I know it came from you. Note: Anyone can tell that you send me a message because they can use your public key to decrypt it, but they cannot see what is inside the message as it is still encrypted.
Turn around the encryption. You encrypt with your private key, then my public key. I can decrypt it with my private key and your public key (and so know it came from you). I get the original message and know it came from you. Note: No one can tell who send me the data, as they cannot encrypt it because they do not have my private key.
If you understand these concepts you are doing well.
Integrity checking
One use of the private/public keys is for integrity checking:
For a payload, I calculate the checksum (a complex calculation on the data, such that any change to the data will give a different checksum calculation result). I take this checksum value and encrypt it with my private key, and attach it to the data. I send the data and encrypted checksum to you. You do the same calculation. You decrypt the encrypted checkum and it should be the same as your checksum calculation. If they match you know the data came from me, and is what I sent.
A bad actor could intercept the traffic from last week, and replay it this week. The above integrity check would show the data came from me, but not that it was last weeks data. There are other techniques for this.