CWWKS1776E: Validation failed for the token requested by (COLINCOO2) using the (RS384) algorithm due to a signature verification failure:
CWWKS1737E: The OpenID Connect client (COLINCOO2) failed to validate the JSON Web Token. The cause of the error was: (JWT rejected due to invalid signature). After I added the certificate to the keyring, I needed to restart the server to pickup the change.
CWWKS2915E: SAF service IRRSIA00_CREATE did not succeed because group null was not found in the SAF registry. SAF return code 0x00000008. RACF return code 0x00000008. RACF reason code 0x00000010.
Explanation: The JWT has a userid, and the userid/realm mapping does not exist in the RACMAP definitions. I think this is a bug… it should not have got into RRSIA00_CREATE if there is no userid.
Basic configuration errors
When there was no matching issuerIdentifier in the openidConnectClient, I got
{“error_description”:”OpenID Connect client returned with status: SEND_401″,”error”:401}
With the above I got in the trace
… Jose4jUtil E CWWKS1737E: The OpenID Connect client (…) failed to validate the JSON Web Token . The cause of the error was: ( CWWKS1773E: Validation failed for the token requested by the (…) OpenID Connect client for the (…) user because the token is outside of its valid range. This error occurs either because the (2025-08-08T18:45:15.182Z) current time is after the (2025-08-08T18:03:21.000Z) token expiration time or because the (2025-08-08T17:13:21.000Z) issue time is too far away from the (2025-08-08T18:45:15.182Z) current time.)
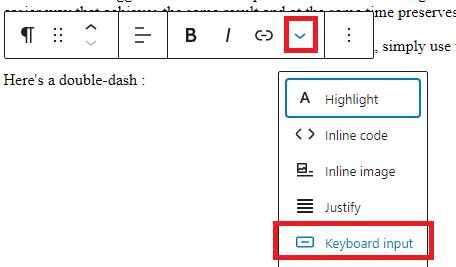
I had documented some Unix-like commands, of the format dash dash help, but these were displayed like strange dash help, and so if I searched for the text, it was not found. If I copied it – and user id, it was not valid!
See JWT for my blog post on what JWT are and how they work.
I also gave myself the additional challenge of not saving sensitive information in disk files.
Once I had got the basics working using a Bash script, I used Python as a proper solution, because I could capture the information from the requests much easier.
I used cut and paste to copy the JWT from the output of the CURL z/OSMF request, and paste it in token=”” in the MQ script. I did this because my BASH scripting was not up trying to getting the JWT from the z/OSMF script.
JSON Web Token(JWT) is a technique of authenticating across systems. It depends on trust, and technology similar to TLS and SSL.
The high level picture
A client wants to use a service on a server.
On the client machine
The client creates a payload containing authentication information, such as subject(=userid), issuer(=machine/company name), issued time, and expiry time.
This payload is signed using a private key. Where signing is doing a checksum on the payload and encrypted the checksum with the private key.
The payload and signature are sent to the server.
On the server machine
The server has a list of definitions, containing a issuer and other information, the name of a keyring, and the name of a certificate. The trust comes from if you trust the client then you store the public key for the client in the keyring. If you do not trust the client, you do not make the certificate available.
When the data from the client machine arrives, the list of definitions is processed until a match is found. It checks the issuer and other fields, (it can use filters) and if they match, checks the signature of the payload to find the public key in the keyring, and validates the signature.
If everything matches, information from the payload and the definition on the server are used to look up a list of subject, and issuer to get the RACF userid to be used.
The thread switches to the userid and does the application work.
issuer=”zOSMF” this is put into the payload. It is used to help identify the realm
keyAlias=”CONN2.IZUDFLT”. This is the certificate with the private key in the keyring which is used to sign the JWT
expiresInSeconds=”10″ how long the JWT is valid for. During testing I set this to 600 seconds.
jwksUri=”https://${izu.jwks.hostname}:${izu.https.port}/jwt/ibm/api/zOSMFBuilder/jwk” if you want the server to issue a request to the client asking for validation, this is the URL the server would use.
Use Python
This is very easy
from datetime import datetime, timezone, timedelta import jwt
# open the private key and read the contents pemfile = open("/home/colinpaice/ssl/ssl2/colinpaice.key.pem", 'r') keystring = pemfile.read() pemfile.close()
# Create the header. Specify the type, and the encryption algorithm header= { "typ": "JWT", "alg": "RS256" }
# get time in number of seconds since "day 0" now = datetime.now(timezone.utc) payload = { "token_type": "Bearer", "sub": "ADCDC", # userid "upn": "ADCDC", "realm": "PYTHON", "iss": "PYTHON", # issuer "iat": now, "exp": now + timedelta(seconds=6000) # valid for 6000 seconds
}
# encrypt it and create the jwt token = jwt.encode(payload, keystring, algorithm='RS256')
mapIdentityToRegistryUser=”false” says use the realm in this definition and the userid(subject) from the payload to look up the in the RACF RACMAP to get the userid.
If you specify “true” it uses the userid(subject) from the payload, and the sysplex name. This means a userid “COLIN” from a z/OS system, and a userid “COLIN” from Linux – get the same userid on z/OS.
Note: If they public key for the JWT is not in the keyring, add it, and restart the server.
The registry is the realm name from the server definitions.
if a valid userid is returned from the mapping, the thread is changed to run as that userid, and execute the application work – as that userid.
The backend server is a little more complex
You need a <openidConnectClient ../> for each “client” system the server supports.
You can specify one <authFilter../> to restrict what the <openidConnectClient ../> processes. For example if can be an IP address(10.1.0.2) or a range (10.1.*.*), or restrict it by URL.
For the <openidConnectClient ../> definition to match it needs
The signature validated – so the public key needs to be in a keyring. (You could have a different keyring for each realm)
The issuer from the payload to match the definition
The input data must pass the authFilter.
You need to plan for
the realms you need,
the mapping of subjects and realms to userids in the server,
headerName=”colin”. My curl request has -H “colin: $token” where token is the bash variable with the is the JWT token. Without this, the request needs -H “Authorization: Bearer $token”
realmName=”zOSMF” used with the userid to lookup in the RACMAP table for the z/OS userid to use
signatureAlgorithm=”RS384″ matches the value in the JWT. (I had problems using RS256)
trustAliasName=”CONN1.IZUDFLT” the name of the certificate to use on the server
trustStoreRef=”defaultKeyStore” points to the keyring definition
I spent time trying to track down in the MQWEB server, why my JSON Web Token was not working as I expected . I found it hard to trace the problem, and tried many trace parameters till I found some which provided the information I needed. It was not an easy journey.
described here, but this was slow and had the side effect in that it inserted blank lines to the mqwebuser.xml file, and made each xml entry one long line, and lost all of my nice formatting!
Issuing the command from the console means that the mqwebuser.xml file is not changed, and when you restart the MQWEB server it comes up with what you specified – rather than the last setmqweb command.
Editing the mqwebuser.xml manually
For MQ the trace definition is taken from the variable traceSpec.
The last value is used – so my trace definition was used.
I could easily move these around to get different traces.
When the MQWEB server is restarted, the last definition will be used – so remember to move the normal entry to the end of the definitions (with value=”=info” or similar).
Using a more complex value
The trace entry I was given was over 150 characters long, and was difficult to enter into the file or on the command line. I had to enter it in pieces, and kept getting blanks in the wrong place. You can use symbol substitution
You can see a more complete trace entry (com.ibm.ws.webcontainer.security.AuthenticationResult ) for the record.
You can now specify this trace entry in the <variable name=”t2″ value=”…” . And restrict which entries you want, for example value=”com.ibm.ws.webcontainer.security.*=all” .
Once I had found which trace records I wanted, I went back traceFormat=”SIMPLE” because the output was easier to read.
A trace entry with value=”io.openliberty.security.*=all” can produce a lot of output.
You may get enough to debug your problem using value=”io.openliberty.security.*=fine“, value=”io.openliberty.security.*=finer“, or value=”io.openliberty.security.*=finest“
Putting your definitions in a separate file
I put some of my definitions in a separate file trace.xml
<server>
    <!-- always specify this one  -->
    <variable
    name="t1"
    value="*=info"
    />
   ...
</server>
You can incorporate these changes using
<include location="trace.xml"/>

<!-- and use the definitions -->
<variable
name="traceSpec2"
value="${t1}:${t2}:${t3}"
/>
If you change the trace.xml file, it will not cause MQWEB to reprocess it. You need to make a change (such as change a blank to a blank) to mqwebuser.xml for MQWEB to notice and process the file.
Displaying the trace record so it fits in the window
A trace record can be hundred of characters long – and requires to scroll sideways many pages.
The blog post Processing lines in ASCII files in ISPF edit macros has a useful ISPF edit macro which displays a row from the file, flowed so it fits into the screen width – and as the trace files are in ASCII, converts the output to displayable EBCDIC.
This made looking at the data much easier.
How I do tracing
I am the only person on my z/OS machine, which make debugging problems much easier. With all my attempts to resolve problems, I found my trace log and message log files were getting too large for me to use ISPF edit on them. Below is how I use the trace files, it generally works.
I edit the file, delete most of the record to leave one or two records, then save it.
I run my test
I edit the file again and it should have only the entries added since the first step.
Note, if you delete the file the logging code, detects the file is deleted, and stops writing to it. If you delete rows, then records are written to the end of the current file.
I was trying to make it easier to read the trace lines from Liberty. These lines can be hundreds of characters long – and it needs many scrolls right and left to display it. If I extracted and displayed the line – it displayed garbage because the line was in ASCII, and if you just displayed the line, it displays the ASCII values.
This raised several challenges.
How do do you convert from ASCII to EBCDIC in an ISPF Rexx macro.
How do you nicely display a long line on one screen.
How do do you convert from ASCII to EBCDIC in an ISPF Rexx macro?
I could not find any easy code to copy, so I had to write code to create the ASCII to EBCDIC mapping in Rexx.
/* REXX */ /* exec to display long (Liberty) logs by flowing text */ ADDRESS ISPEXEC 'ISREDIT MACRO' "ISREDIT autosave off " ascii0 = "000102030405060708090A0B0C0D0E0F101112131415161718191A1B1C1D1E1F" ebcdic0 = "................................" ascii1= "202122232425262728292A2B2C2D2E2F303132333435363738393A3B3C3D3E3F40" ebcdic1 = " !..$.&'()*+,-./0123456789:;<=>?@" ascii2 ="4142434445464748494A4B4C4D4E4F505152535455565758595A5B5C5D5E5F60" ebcdic2= "ABCDEFGHIJKLMNOPQRSTUVWXYZ(\)._." ascii3 ="6162636465666768696A6B6C6D6E6F707172737475767778797A7B7C7D7E7F" ebcdic3= "abcdefghijklmnopqrstuvwxyz{|}~."
ascii = x2c(ascii) /*get the current line number, and extract it */ "ISREDIT (l) = LINENUM .ZCSR " "ISREDIT ( d ) = LINE " l /* convert it to ebcdic */ out = translate(d,ebcdic,ascii)
The upper part of the code just creates the translation tables. For example ASCII 0x21i is EBCDIC “!”.
The code
"ISREDIT         (l) = LINENUM .ZCSR "
   "ISREDIT      ( d )  = LINE   " l
/* convert it to ebcdic from ascii  */
out = translate(d,ebcdic,ascii)
say out
reads the current (.ZCSR) line of the file into variable d, converts to EBCDIC and displays it.
How do you nicely display a long line on one screen?
I used
out = translate(d,ebcdic,ascii)
/* and display it */
out = strip(out)
do  i = 1 to length(out) by 72
    say substr(out,i,72 )
end
which cuts the message into 72 byte chunks.
I enhanced this to allow me to enter a number of lines on the macro
/* REXX */ /* exec to display long (Liberty) logs by flowing text */ ADDRESS ISPEXEC 'ISREDIT MACRO (lines) ' "ISREDIT autosave off " "ISREDIT (fcol,lcol) = DISPLAY_COLS" /* get width of the screen */ width = lcol - fcol ascii0 = "000102030405060708090A0B0C0D0E0F101112131415161718191A1B1C1D1E1F" ebcdic0 = "................................" ascii1= "202122232425262728292A2B2C2D2E2F303132333435363738393A3B3C3D3E3F40" ebcdic1 = " !..$.&'()*+,-./0123456789:;<=>?@" ascii2 ="4142434445464748494A4B4C4D4E4F505152535455565758595A5B5C5D5E5F60" ebcdic2= "ABCDEFGHIJKLMNOPQRSTUVWXYZ(\)._." ascii3 ="6162636465666768696A6B6C6D6E6F707172737475767778797A7B7C7D7E7F" ebcdic3= "abcdefghijklmnopqrstuvwxyz{|}~."
ascii = x2c(ascii) /*get the current line number, and extract it */ "ISREDIT (last) = LINENUM .ZLAST" "ISREDIT (l) = LINENUM .ZCSR " if lines = "" then lines = 1 do j = l to (l + lines - 1) if (j > last) then leave "ISREDIT ( d ) = LINE " j if rc <> 0 then leave /* convert it to ebcdic */ out = translate(d,ebcdic,ascii) /* and display it */ out = strip(out) /* display full width, based on screen size */
do i = 1 to length(out) by width say substr(out,i,width) end say " " end exit
so if my macro is called zz, I can issue the command zz 3 and it displays 3 lines in the file
The couple of hours it took me to write this have made my life so much easier.
I had a working mapping for a Linux generated certificate to a z/OS userid. And then it wasn’t working. It took me 2 days before I had enlightenment. Although I had undone all of the changes I had made – well all but one.
Which says it the certificate with Subject: C = GB, O = cpwebuser, CN = colinpaice come in, then it maps to IBMUSER. Yes, the terms are in a different order, and there are “.” instead of “.” but it worked.
I started working with JSON Web Tokens (JWT), and it stopped working. The userid was coming out as IZUSVR – which is the userid of z/OSMF. I struggled with traces, and wrote my own little program to map the certificate to a userid – but still it was IZUSVR.
The enlightenment.
With JWT they are signed by a private key, and the public key is used to check the signature (that is check the checksum of the data is valid). To do this, the keyring needs the certificate in the keyring. I was lazy and used the same certificate to sign the JWT, as I used to do certificate logon to z/OSMF.
To put the certificate in the keyring you need to import the certificate. I copied the certificate from Linux, using cut and paste and imported it
This imports the certificate and associates it with the specified userid, ID(IZUSVR). Now, when the certificate arrives as part of the certificate logon to z/OSMF, it checks to see if it is in the RACF data base – yes it is – under userid IZUSVR. It does not use the RACDCERT MAP option.
I reran this job with userid ADCDB – and the JWT had ADCDB in the definition.
To make it more complex, the Liberty Web Server within z/OSMF caches some information, and this complicated the diagnosis. In the evening it worked – next morning after IPL – it didn’t!
Lesson learned
Use one certificate for certificate logon, and another certificate for JWT.
A year or so ago I had come across the term realms in relation to security, but could not find what they are or how they are used.
I’ve been working with JSON Web Tokens, (to identify a Linux user to the MQWEB server on z/OS) and have found out what realms are.
The short answer is a realm is a zone of definitions it could be a machine, or a company. OK – this is not very clear.
The high level view
Take the scenario, I have a z/OS and a Linux environments. On both systems I have a userid COLIN. When I create a JWT
on Linux I give it parameters subject:COLIN, issuer:LINUX
on z/OS I give it parameters subject:COLIN, issuer:zPROD
By some magic the JWT arrive at my web server, and I have configured the server to lookup the information in RACF.
In this scenario the realm is either LINUX or ZPROD.
I define mapping on z/OS (RACMAP) which say
For (subject: COLIN, Realm: LINUX) set the userid=NOONE
For (subject: COLIN, Realm: zPROD) set the userid=IBMUSER
So depending what is in the payload I can get a different userid on z/OS to issue my MQ commands.
A more complex example
In my MQWEB server I have definitions like
openidConnectClient: when issuerIdentifier=”zOSMF” and the signing certificate matches the keyring label “COLINPAICE” in keyring …. then use realm=”zPROD”
For user COLIN, this would match a RACMAP with
For (subject: COLIN, Realm: zPROD) set the userid=IBMUSER.
ICH408I USER(START1  ) GROUP(SYS1    ) NAME(####################)
  DISTRIBUTED IDENTITY IS NOT DEFINED:
  ADCDC ADCDPL
My z/OS has sysplex name of ADCDPL.
Which says there was no mapping for the userid ADCDC, and the realm name ADCDPL. This took me half a day to resolve!
With this if I had configured RACMAP to have subject ADCDC and realm ADCDPL mapping to SYS1U – if a request came in from z/OS or Linux both would get userid SYS1U – which I am sure you do not want to happen.
The short answer is a realm is a zone of definitions it could be a machine, or a company. OK should now be perfectly obvious.
I spent a long time trying to find what data from a Zowe CLI commands was being sent to the backend. I did traces on the back end – but they did not show me the data. I eventually found traces for the work station end.
The output is in the directory pointed to by ZOWE_CLI_HOME – which defaults to ~/.zowe/logs on Linux.
ZOWE_APP_LOG_LEVEL
The ZOWE_APP_LOG_LEVEL trace is boring. It is in home/colinpaice/.zowe/logs/zowe.log
[2025/08/02 15:05:37.754] [TRACE] [main.js:40] Init was successful [2025/08/02 15:05:37.837] [DEBUG] [MQSessionUtils.js:22] Creating an MQ session from arguments [2025/08/02 15:05:37.845] [INFO] [ConfigAutoStore.js:135] Skipping update of profile properties. Check that config file exists and autoStore is true.
ZOWE_IMPERATIVE_LOG_LEVEL
The ZOWE_IMPERATIVE_LOG_LEVEL=debug trace in logs/imperative.log has